How to Grow Mint Indoors – A Versatile Herb
Mint originated in the Mediterranean region. It gradually spread to England and then America. It is now grown throughout Eurasia, Australia, North America, and southern Africa. The United States produces 70% of the world’s spearmint and peppermint in states such as Oregon, Washington, Idaho, Indiana, California and Wisconsin. There are over 600 varieties of mint. The most common are peppermint and spearmint. Mint has a multitude of uses, from soothing upset stomachs to easing acne to deterring deer from your garden. Mint can be grown in the garden or in pots inside. Read on to see how to grow mint indoors and learn a few uses of this versatile herb.
(Some of the links within this post are affiliate links on which I receive a small compensation from the sale of certain items.)
(As an Amazon Associate I earn from qualifying purchases.)
How to Grow Mint Indoors
Mint is an easy herb to grow. It can be grown from seeds, cuttings or small plants. For more general information on planting herbs, read Planting Herbs in a Garden.
Seeds and Transplanting:
You can start mint indoors any time of the year.
1. After purchasing mint seeds, (click here for mint seeds from seedsnow.com) , prepare the starter kit. One recommended complete kit is the Jiffy Seed Starting Greenhouse Kit from Amazon, or use any seed starting tray with peet pellets or seed starter soil. A homemade seed starter soil will consist of equal parts sand, peat, and perlite mixed together.
If the starter soil you have is dry, moisten the soil over night so it is moist but not dripping wet.
Fill the starter tray 3/4 of the way to the top of each section. Be sure each section of the tray has a drainage hole.
2. Mint seeds are very tiny, so do your best to place just a few seeds on the top of each section. Cover them with a very thin layer of vermiculite. The seeds germinate best when exposed to the heat.
3. Place the tray in a bright sunlit room where it will receive consistent heat. The seeds prefer room temperature or slightly warmer, between 68 and 75 degrees Fahrenheit (20 degrees to 23.9 degrees Celsius).
4. Mist your tray every day to keep the soil moist until the seeds germinate.
5. It can take up to 3 weeks for the seeds to sprout. Normally they germinate within 10 to 15 days.
Sprouting Seeds:
1. Once the sprouts have 2 complete leaves, you can thin out each section of the tray to have one stem standing.
2. After the sprout has 4 or more complete leaves, it is time to transplant it into a larger pot.
3. Transplant them into a 6 to 10 inch diameter pot full of rich, moist, well drained soil.
Tip Cuttings and Plant Division:
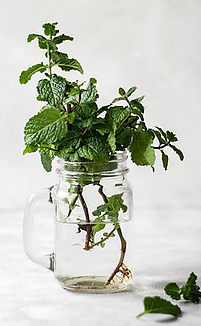
Tip Cuttings:
The tip cutting technique to propagate more mint plants is very simple. It’s a wonderful way to create a new plant and offer it to a friend, family member, or just to have another plant!
Simply cut a 5 to 6 inch top section of a stem from above a leaf shoot. Remove the bottom 2 to 3 inches of leaves and place it in a glass of water in a window that receives at least 4 to 6 hours of full sun each day. Watch it grow root tendrils. When the root tendrils are about an inch or two long, plant it into a pot using the method described above.
This is a great science lesson for a young child!
Division of Plants:
If your plant is rather large, divide the plant into sections and transplant each section.
Remove the mint from the pot.
Find a spot where you can easily tear it apart. With your hands grab the roots and the leaves and tear apart.
Repot.
Buy an Already Established Mint Plant:
You can always take the easy route and purchase an already established plant. After you bring it home, transplant it into a 10 inch diameter pot with a drainage hole and follow the directions above.
Easy peasy!
General Tips About Mint
- Harvest your mint leaves in the morning while the oils are the most robust.
- Pinch off the tips of the stems to make your plant more bushy and less leggy.
- Position your plants where guests will brush against them and release its lovely fragrance.
- Keep your plants contained in a pot. Mint is very invasive and will quickly take over a garden.
- Continuously harvest the tops of the plant for use throughout the year. Remove the leaves from the stems and freeze the mint on a piece of waxed paper. Then transfer them to a freezer bag to be used later in the season.
- Do not allow the plants to flower and seed.
How to Care for Your Mint Plant
Sun Requirements:
1. Mint is not fussy and will thrive in indirect sun to partial shade.
2. In the spring and summer place the pot in an east facing window (morning sun).
3. In the fall and winter place the pot in a west or south facing window (midday to afternoon sun).
Water/ Humidity Requirements:
1. Mint prefers moist but not wet soil. When the top 1/2 inch of the soil is dry to the touch, water it to keep it evenly moist.
2. Mist the plants or keep them in a humid space of your home such as a bathroom with a window or the kitchen.
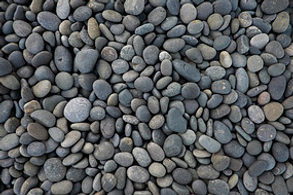
3. If the plant is not placed in a humid room, place the pot on a tray filled with pebbles and water.
Fertilize:
1. Mint does not need to be fertilized however you can occasionally give it a half dose of all purpose, water soluble fertilizer. Purchase through Amazon.
2. Do not fertilize it too much. If you over fertilize the plant it will decrease the herb’s flavor.
Uses of Mint
There are many uses for mint. Here are just a few suggestions.
1. It improves your skin.
- Brightens your complexion
- Treats acne
- Hydrates and tones the skin
- Removes blackheads
- Slows aging
- Removes and lightens acne scars
- Diminishes under-eye dark circles
For more information on care of the skin with mint, refer to Stylecraze.
2. Mint has health benefits according to healthline.com.
- Mint includes nutrients including Vitamin A and antioxidants.
- Ingesting mint oil may improve IBS (Irritable Bowel Syndrome).
- It may help relieve indigestion.
- Smelling the aroma of mint oil (from Etsy) may improve brain function such as memory and alertness.

- Applying mint to the breast may relieve pain associated with breastfeeding.
- The peppermint menthol (from Etsy) may improve cold symptoms.
- It may mask foul-smelling breath for a few hours.
- Mint can be easily added to your diet in the form of plant leaves, capsules, or oils.

3. Culinary Delights
When I think of mint, I think Mojitos. Below is a simple mojito recipe from loveandlemons.com using fresh mint leaves. Use Cuban, or “Mojito” mint (Mentha villosa) to create an authentic mojito.
This recipe yields one drink.
Ingredients:
- 5 mint leaves, more for garnish
- 2 ounces white rum
- 1 ounce fresh lime juice
- ½ ounce simple syrup (check below for recipe for simple syrup)
Ice - Club soda or seltzer
- Lime slices, for garnish
Instructions:
Lightly muddle the mint in the bottom of a cocktail shaker until aromatic. Add the rum, lime juice, simple syrup, a handful of ice and shake.
Strain into a glass filled with ice. Top with a splash of club soda or seltzer and garnish with lime slices and more mint.
Here is a video on how to muddle mint. You do not add the sugar for this mojito recipe, just mint leaves.
Recipe for simple syrup.
- Place equal parts sugar and water in a sauce pan. (half cup water, half cup sugar)
- Turn up heat to medium and stir until sugar dissolves.
- Remove from heat and cool to room temperature.
- Store it in a sealed container in the frig for up to one month.
==============Check Etsy for all your Mint Needs===========
Conclusion – How to Grow Mint Indoors
As you can see growing mint indoors is very easy. You can either begin the plant using seeds or a cutting, then nurture the roots, transplant it and finally use it in a variety of ways. If one of these methods is too much trouble, just purchase a plant. To learn about the different varieties of mint, click Different Types of Mint.
I hope you found this post useful. Please leave a comment below and share this post with others.